Printmaking with 5th Grade: Collagraphs

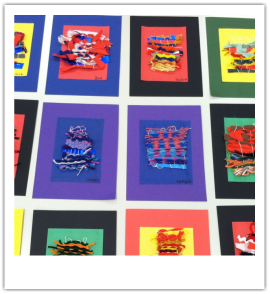
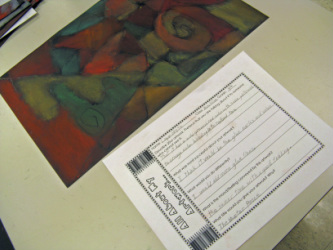
I took a printmaking course at Kutztown University this summer as part of my Master's Degree program. I learned so much, and fell in love with Collagraphs, as a form of printmaking. Collagraphs, in simple terms, are low-relief collages that one uses to create a print. In the printmaking studio we are using an actual printing press and oil-based ink, but it can be done in the elementary setting with a few simple materials.
To begin, we looked at Romare Bearden's collages which have beautiful, thick textures, discussing the subject matter and technique of collage. I then showed my students my own collagraphs and plates, and we discussed how and why they were made. We made connections that collagraphs are collages used for printmaking.
To make our collagraphs, we used: Posterboard, Mr. Sketch watercolor markers, glue, scissors, spray bottles with water, and brayers.
Students designed a printing plate by collaging posterboard onto a larger piece of posterboard (or cardboard). They let the glue dry overnight, and the next class they "inked" their plates with the markers. Immediately following the inking, they sprayed the plate with a mist of water, layed down the paper, and took about 1-2 minutes to thoroughly roll the brayer over every surface. They learned problem-solving with printmaking by figuring out how much water they need to use, and how much rolling with the brayer they needed to do. Students had so much fun and were very engaged. The outcome was amazing!
A big thanks to Lauren Pfeiffenberger of Dali's Moustache for the techinque!


Kindergarten: Where the Wild Things Are
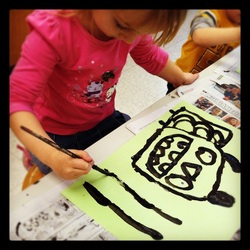
In Kindergarten, we read Where the Wild Things Are, a classic by Maurice Sendak. This is a culminating project using everything we learned about shapes, lines, textures, and how they can all come together to create pictures! Union Canal's Kindergarteners did an incredible job painting their own "wild things".
Each student received a colored paper (lime green or banana yellow) with two googly eyes glued onto it. From there, they painted their wild thing using black tempera, branching out from the eyes as a starting point. The following week, we used oil pastels to give their creatures some color. The oil pastels allow for better control, rather than giving them colored tempera paint. I have not tried this project with tempera paint for the colorization, because the oil pastels always look so amazing!
Pictures to come...
American Folk Art: Face Vessels
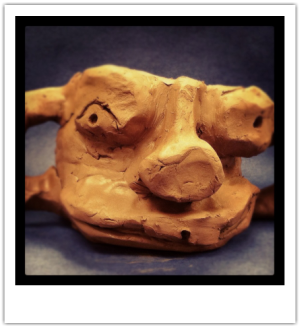
Fourth grade students viewed and discussed images of ceramic face vessels, both historical and contemporary. We learned the historical significance of these vessels how they first appeared in the American South in the mid-1800s, created by African American slave potters.
Students designed and sculpted their own face vessels, and glazed their pieces after the bisque firing.


Recycled Weavings
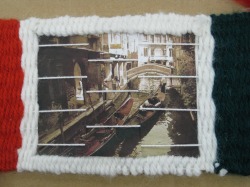
After investigating various images of recycled artworks, second grade students created their own weaving by using recycled materials. Students used cardboard looms cut from cardboard boxes, learned to string their own warp strings, and weave with scraps of yarn, string, fabric, plastic, feathers, and other found objects (one student used a drinking straw!) They did a fabulous job, and were very engaged. The weavings were removed from looms and double mounted on paper.


Clay Animal Habitats
Continuing our unit on animals, second graders had two choices today. In order to differentiate, I am having more choices in my classroom when it comes to most projects.They could a) draw their clay animal from observation and draw it living in it's habitat or b) create a three-dimensional habitat using paper folding techniques and mixed media. I demonstrated both (not a finished product, but just so they get the idea, and had resources for them to read and images to look at to learn more about their animal (I got these great illustrated animal flash-card type of sets from Target in the dollar section, as well as dinosaurs and flags of the world - a GREAT resource!).
They were very excited about the possibilities of this project! Two students chose to draw their habitats and the others chose to create a 3D habitat. The pictures below are works in progress...
They were very excited about the possibilities of this project! Two students chose to draw their habitats and the others chose to create a 3D habitat. The pictures below are works in progress...
Clay Animal Sculptures by 2nd Grade
Second Graders explored the question, How can I sculpt a four-legged animal out of clay? We learned what it means to sculpt and be a sculptor by looking at examples of contemporary sculpture. We also learned essential sculpting techniques for working with clay and how the kiln works.
Check out a few examples of the animal sculptures below!
Check out a few examples of the animal sculptures below!


Non-Objective Glue & Chalk Drawings by Fourth Grade
After exploring the Non-Objective work of Sonia Delauney, Wassily Kandinsky, and various artists, Fourth Grade Students created their own non-objective work in glue & chalk pastel. They reflected on their own and others' work as they wrote artist statements. We had some amazing conversations about each others' artwork! Check out some work below...


2010-2011
Second Grade Imaginary Landscapes
Second grade created mixed-media landscapes, exploring various artworks that strong examples foreground, middle ground, and background. We investigated Vincent van Gogh's painting called The Starry Night, Claude Monet's painting called Impression-Sunrise, and Andrew Wyeth's watercolor painting called Christina's World. The artwork was created using oil pastel, collaged paper, and colored pencil.


5th Grade Red Ribbon Artwork


Third Grade Coiled Animal Pots
If you are wondering, yes, 3rd and 4th grade both did coiled animal pots this year. Why? Well, last year my 20 year old kiln kicked the bucket, and 3rd-5th grade did not get to use clay. Therefore, I extended 4th grade's project and let them create large sculptures in white clay over the span of three classes, while 3rd grade had a smaller amount of Red Indian Clay and only to hand-building classes. They both turned out so very well!
Next year, 4th grade will be back to making plates, utilizing some new Amaco Underglazes! Can't wait. I have a deep affection for Amaco anything.
Next year, 4th grade will be back to making plates, utilizing some new Amaco Underglazes! Can't wait. I have a deep affection for Amaco anything.


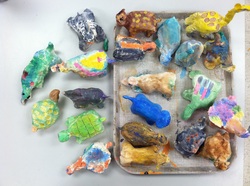
Fourth Grade Coiled Animal Pots
Fourth graders recently created coil pots and turned it into an animal of their choice. We had turtles, chickens, a chameleon, cats, and even a cow complete with udders on the bottom of the pot! There was a lot of creativity and silliness floating around the art room. Check them out below...


Fifth Grade Weavings: How can I create a weaving that tells about me?
Fifth Grade took all that they learned from previous years, and applied it to a new weaving project. They were asked how could they create a weaving that it about them? We looked at weavings from different cultures, contemporary weavings, and a few examples of student work. The outcomes were amazing!


OAXACAN PAPER MACHE ANIMALS - 2009
Mrs. Wise's 3rd grade class created paper mache animals after learning about the Oaxacan wood carvings of animals. The process was messy and time intensive, but we loved every moment of it. The end result was incredible! To learn more about the people of Oaxaca and their artwork, click here.


